Introduction
Once in the admin area open under default modules CRM > Contacts. Here you can administer all your users. Please know that users have to be always created on a club level so we wrote this guide based on that fact. You can however also open the same menu on global, national and area level and perform the same actions. We just recommend not creating a new user there.
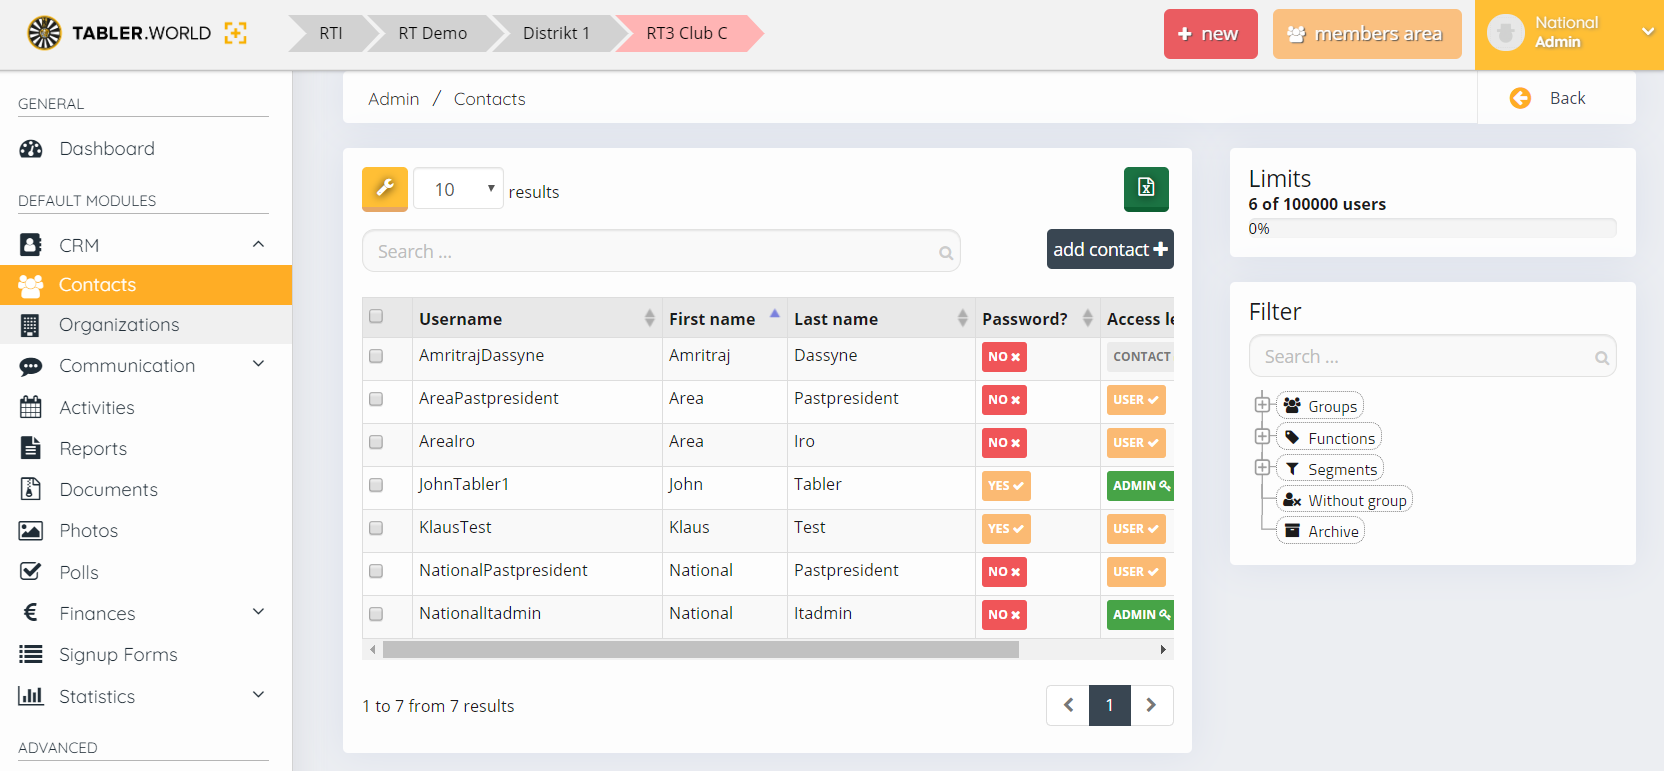
You can reference the picture on top to see most of the sections explained below.
Contact vs User – user types
On the platform a user can be one of two types of users. On the table you can see the marking with the column « Access level ». There are two types of contacts:
- Contact. These are users that do not have access to the platform. These can be former members or users that have signed up for activities (created for the purpose of the signup and in case there is any billing needed). In any case these users can not log in to your club or roundtable.world anymore
- User. These are active users (members of your club) and have the possibility to logon to the platform. If a user has elevated rights on the table they are shown as:
- Admin. User has administrative rights to the club data
- Manager. User has management rights to selected data
The user type is automatically changed by setting different groups & functions of the user. After all it depends largely on if the user is a member or not. See [LINK] to understand how to manage groups & functions.
Action button

The action button is where the magic happens. By clicking the button by a user you will have some or all these options. If something is not visible this simply means
- Profile. Links you to the profile of the selected user where you can manage his data and group & functions. See [LINK] to learn how to use this page.
- Record. This is a user’s record vault. See [LINK] for more information
- Take over. Gives you the ability to see the page as that user. Please be aware, if you take over an account that has not created his password or opted in to the platform you are taken to the opt-in page and forced to complete that process instead of the user. The only way to stop that process is to go to your browsers settings and clearing out the cookies.
- Archive. This is the remove/delete a user option. See [LINK]
Customizing the user table and exporting data to excel
Above the table area you have a yellow button with a wrench icon. Clicking this will allow you to customize the display of the table. The window that comes shows two boxes on each side of two horizontal arrows. If you would like to make a column visible click on the text on left side and click the arrow to move it right. Do the exact opposite if you like to remove the column. Vertical arrows allow you to change the position of the columns.
Changing the number next to the wrench decides how many users are shown at once.
Exporting data is very similar to user table customization. To open the export wizard click on the green Excel button above the table area, select which columns to export, can select the order of the data and at least choose the format. The file will be downloaded to your computer [and will be emailed to you also].
Also you can also use the search-box on top of the table to find specific users by name or username.
Filters, Segments and Search
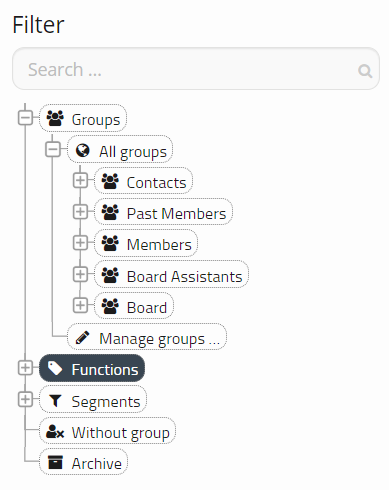
The search box is to search for specific functions & groups.
The options in the tree will change the display of the table that fit the selected options.
In case you need to do any changes to the groups or functions you can click Manage groups. This will send you to another admin menu where groups and functions can be customized. More in the « Managing user groups and function » article.
Segments is the ultimate customization tool that allows you to combine different types for reusable more complex filters that your level needs. More in the « Working with segments » article.
Without group will show you all users that have no active groups or functions in your table. This can include users that have been transferred to other tables.
Archive shows all users that have been archived and ultimately been removed. Here you can also activate the user again if needed. This will restore him back and new groups can be assigned to him as with any user.
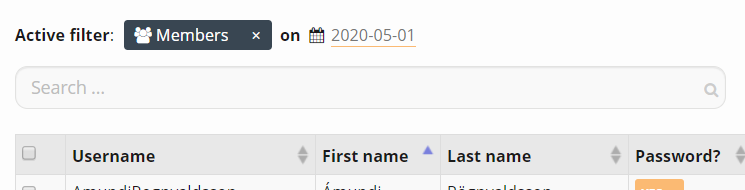
To reset any active filter you can click on the small x by the Active filter row as seen on the below image. It will restore the table back to showing all users.
You can also change the date next to the active filter if you want to see the filter as it was on a specific date.
This post is also available in:  English (Anglais)
 Deutsch (Allemand)
 Nederlands (Néerlandais)
 Svenska (Suédois)
